Showing posts with label creative. Show all posts

Wednesday, October 23, 2013

Look WHOOOO's Here! ~ FUN Crochet Owl Exchange

Happy Wednesday everyone!

How FUN!

Look WHOOOOO just flew in from the UK?

My friend Lynne made this wonderful owl ornament for me and I made this one for her...


We used this FREE Owl Ornament Crochet Pattern she found to make them for each other!


Aren't they cute?


The pattern is super FUN and easy to do!

Infact, I have used the circle body part of the owls for two other projects that I enjoy everyday!

I made a window treatment and a change purse with these handy circles.

It is so FUN to find things you like and rework the use or idea to make it your own!


What FUN things are you doing today?

Please leave us a note and let us know!

We cannot wait to hear all about it!

xoxoxo
Melissa & R-Chee

Monday, September 16, 2013

My Monday Morning Muse ~ Archie


Happy Monday everyone!

Sometimes changing one small thing from your daily routine can make your whole day feel new and inspiring.

So when I got up to my office this early morning I decided to start my day in a different way.

Instead of getting right to work by turning on my computer like I always do... I grabbed a pen and a piece of paper and
did a quick sketch of my favorite thing in the world...

My pug ~ Archie!

Obviously as you can see from his pose, he was not quite ready to wake up this morning! 

I took advantage of this quiet moment of him curled up in his favorite chair waiting for the sun to rise. :)

I used a pen instead of a pencil so that this exercise would be fun, freeing and fast as I could not erase my lines.

When having FUN is your intent there is no room to be fussy! :)

I find that the option to erase will actually make your drawing less appealing to you afterwards as you're exhausted from trying to be perfect!

I gave myself 15 minutes to sketch him and 20 minutes to color him in using photoshop elements.


Ta Da!

This is my final piece that brought a huge smile to my face when I was done.

Whenever I finish creating something, whether it is a drawing, painting or fiber creation, I always take a moment to appreciate it and the inspiration and energy it took to make it. :)

It is like it just appears and I say... where did that come from?

Whose hands made this? :)

That is the magic of the life-force that we all have, focus and share everyday.

Thank you all for always sharing yours with me.

You inspire me everyday to jump out of bed with a smile.

R-Chee & I are so lucky to have friends like you.

I have created this new pug drawing as both note cards and address labels for you to enjoy on my website pugnotes.com

What other FUN things shall we do together at your house today?

Will we cook your favorite recipe or maybe clean out a junk drawer and find an old treasure we thought we misplaced?

Please leave us a note and let us know!

We cannot wait to come and play with you!

xoxoxoxo
Melissa & R-Chee 

Wednesday, August 28, 2013

Fun With Zippers ~ Big Mouth Pouch 3 ~ Orange Bear Pouch


Happy Wednesday everyone!

R-Chee is smiling back at our new bear pouch today!

I made this one for us after falling in love with the one I showed you on Monday that I made for Melanie. :)

I usually do not make two of something, but I decided we are identical twins and should have twin bear pouches too!

I made mine exactly the same, but went into my stash & used a skein of orange Lion Brand Wool-Ease Thick & Quick for the bear instead of the brown that I used up for Melly's.


Ta Da!

He was so FUN to make that I started another big mouth pouch creature that started as a bear but now has morphed into another FUN creature before my eyes!

He is almost done & I cannot wait to show him to you soon!

What are you up to today?

Please leave us a note and let us know!

We cannot wait to hear all about it!

xoxoxo
Melissa & R-Chee

Monday, August 26, 2013

Fun With Zippers ~ Big Mouth Pouch 2 ~ Brown Bear Pouch


Happy Monday everyone!

I have been having so much FUN sewing zippers into my crochet!

I showed you the Cookie Monster I made for Archie last Wednesday.

He was so much FUN to make that I have made two new creations that I get to show you this week and a 3rd one coming soon! :)


Here is the Bear Pouch I just made for Melanie!

I made him up as I went without a pattern and used my favorite bulky weight yarn, Lion Brand Wool-Ease Thick & Quick!


There are two surprises waiting to make you mile when you unzip his mouth!

I sewed in pom poms for his teeth and lined the inside bottom with black fleece for a soft landing when you stick your hand inside! :)


I used larger pom poms for his hands and a tube of the black fleece lightly stuffed for his arms!


Ta Da!

Here he is taking a bow!

I loved him so much that I decided to make myself one too that I will show you on Wednesday!

Have a Super day everyone and thank you so much for always playing with me and R-Chee!

We love thinking up new things to share with you!

What FUN things are you up to this week?

Please leave us a note and let us know!

We cannot wait to hear all about them!

xoxoxo
Melissa & R-Chee

Wednesday, July 31, 2013

My Updo Bag Project ~ Messenger Bag Redo #2


Happy Wednesday everyone!

On Monday I showed you the first of several bags I decided to give a second life to by simultaneously clearing out some of my fabric stash while practicing my sewing skills at the same time this Summer. :)

Today, I am so excited to show you the second bag I redid just by sewing on another retro napkin that I got at a garage sale and a scrap of pug doll fabric from my stash!


Just like the inside of the first one, I added a couple of internal pockets by sewing on a change purse I purchased at Quit-A-Fair a few years ago and a vintage appliqued tea towel that I got on Ebay ages ago! :)


The final touch was to add a row of orange pom pom trim to the front edge!

Ta Da!

The two bags are pretty similar in style, but I like how they match each other without being exactly the same.

Next week I will show you the last two bags I redid.

I am so proud of myself because I even added a zipper to one of them which I never thought I could do!

Thank goodness for the internet and all of its wonderful resources!  I just googled how to sew in a zipper and ...

Voila... I found this tutorial that showed me that even I could do this! :)

What new things have you learned to do this Summer?

Please leave me a note and let me know!

I cannot wait to hear all about them!

xoxoxo
Melissa

Monday, July 29, 2013

Updo Your Favorite Bag ~ Messenger Bag Redo #1


Happy Monday everyone!

I cannot believe we are starting the last week of July already!

The Summer is just flying by!

When I sat down to write this post I realized that I think part of the reason the Summer has gone so fast is that I have been at art camp this whole time!

Even though the one I had planned to go to with Melanie was cancelled by the people running it, we went anyway!

We went to Melly's mountain cabin and crafted together all weekend!

Besides not letting that stop us from our crafts & learning we also took a fabulous Batik class together!

I also realized that I set my whole Summer into a perfect crafting motion this past Spring by closing my eyes and making a whole wishlist of projects I wanted to do and learn in the coming months.

I am having so much FUN doing each one and actually checking them off of the list!

One of my wishes was to practice sewing and feeling more comfortable with my sewing machine in addition to the hand sewing I have always enjoyed doing since I was a little girl.

As I was organizing my craft closet I found several wonderful bags I have collected over the years to carry projects and art supplies in.

What a perfect way practice sewing!

Without having to spend any $, I decided to "updo" them with my scraps of craft stash to make them into brand new bags!

The one at the top of the this post is the first one I did!

All I did to remake my plain burgandy canvas messenger bag was to take an old vintage napkin and sew it down to the front flap with a remnant of my pug doll fabric that I made into a pug patch!

To remake the inside, I sewed a few pot holders and patches that I had collected & made and turned them into pockets and patches!


...and what project would not be complete without a pom-pom trim? :)

I think I have been putting pom poms on everything I have been making this Summer!

Ha Ha! :)

I liked how it turned out so much that I did several more and will show them all to you in the coming days. :)

What FUN things are you up to this week as we begin the last full month of Summer?

Please leave me a note and let me know!

R-Chee & I cannot wait to hear all about your plans!

xoxoxo
Melissa & R-Chee

Wednesday, June 05, 2013

A Wonderful Wednesday Afternoon ~ New Whimsical Blobs!


Happy Wednesday everyone!

R-Chee and I had so much FUN today when we pulled out our set of kid's markers, colored pencils, glitter glue pens and water color paints!

We found lots of whimsical creatures to outline & bring to life in my blob book that I started last Fall in Carla Sonheim's workshop offered through Art Camp for Women.


We had a wonderful day together!

Relax and just make some art from your heart today!

It is so FUN to create something you enjoy in the garden, kitchen, studio or sandbox!

Just Play a bit today!

It will make you happy!

That is the greatest gift we can give to anyone...

A smile & some cheer!

Speaking of creating, smiles, cheer and art...

My twin, Melanie, & I are going on a sister's art retreat together this weekend!

Yipppeee!

We leave on Friday so I will be back blogging next week to show you what we made!

We are going to make more batik paintings and pillows together, crochet and read a book we got just for this weekend to start together and have a summer book club!

What FUN things are you doing this weekend?

Please leave us a note and let us know! 

We cannot wait to hear all about it!

xoxoxo
Melissa & R-Chee

Monday, May 27, 2013

Batik Class 101 ~ My New Creation ~ A Puggy Bullwinkle Pillow!


Happy Monday everyone!

I am so excited to show you the Batik Fabric squares Melanie I learned how to make through Boulder Valley Schools ~ Life Long Learning.

Fiber Artist,Lea McComas, spent the day teaching us how to make Batiks with non-toxic, water soluble dyes and resist to avoid all of the mess and wax traditionally used to create them!

We have never made them before and always wanted to ~ so Melanie and I signed up right away and had so much FUN!

I cannot wait to show you what we made!


Ta Da!

Here is Melanie's finished square and pillow!


I LOVE the designs and colors she used!!!


I created this very puggy Bull doodle that I just love!

We sketched some ideas on paper first and this one just appeared.


I immediately knew this was the one I wanted to paint and transferred the image to my cotton fabric square.

The next step was to squeeze on the Gutta resist to all the areas that I wanted to stay white.

After the Gutta resist dried, all we had to do was paint in the areas with our water soluble dyes.


When I got home, I threw my square in the washer set on cold with a mild detergent and washed out the Gutta.

Unlike wax, the Gutta is easy to work with, mess free and completely washes out so the fabric is soft again instead of being left stiff by the wax residue.

After it came out of the dryer, I hand-colored in the black eyes with a sharpie marker. :)


I decided I wanted to turn my square into a pillow so I pulled out a pillow sham that I had in my linen closet just waiting for the perfect project to use it for!


I ironed my Batik and then pinned and machine sewed it to the front of the sham.


Then to finish it ...


I hand-sewed an orange pom pom trim border around the edges to hide any crooked edges. :)


Ta Da!

I just love how it turned out!

Melanie and I are going to make squares together at our sister's Art Retreat weekend we have planned in June!

We have them all drawn out and ready to paint with our dyes!

I cannot wait for us to spend the whole weekend together in the mountains making lots of FUN things!

Of course, I will show you everything we create!

What FUN things do you have planned this Summer?

Please leave us a note and let us know!

We cannot wait to hear all about them!

xoxox
Melissa & R-Chee

Monday, April 29, 2013

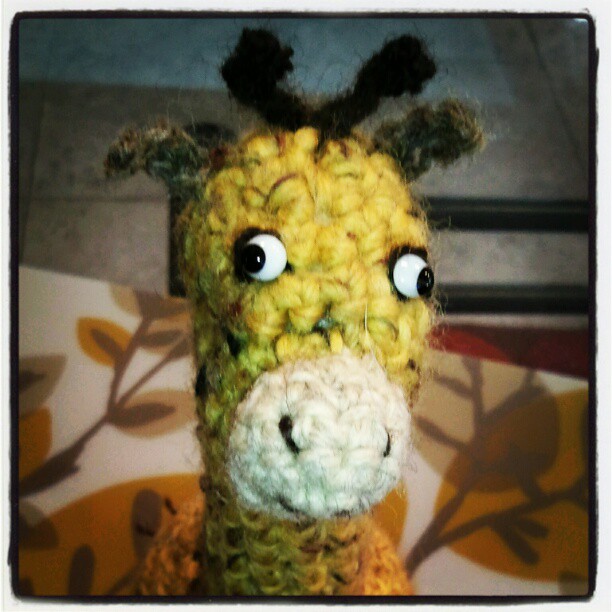
Fun Crochet Giraffe Doll ~ Free Pattern


Happy Monday everyone!

I just completed a FUN & fast project that I could not wait to show you!

It is a Goofy...

Isn't he FUN? :)


He is made in basically all one piece which is a very creative part of this FREE Pattern I found online. :)


I like his short Corgi like legs!


Although he does not know it, this giraffe is actually very European! :)

I tried a new wool yarn to make him and I just loved it!

It is a Nordic wool called DROPS.

They have a huge selection of beautiful and wonderfully priced yarn as well as 1,000's of Free and creative knitting and crochet patterns.

The USA Super Store, http://www.nordicmart.com  is located in CA and is wonderful to shop from online.

I used the Eskimo Dark Yellow Tweed for his body and I really like how it turned out!

His glass eyes are from Germany for a great teddy bear supply company called Pro Bear.


The whole project was so enjoyable to do from beginning to end!

The pattern is very well written and the materials were just dreamy to work with.

To make mine a bit different, I added eyebrows to give him an expressive look, a mane to the back of his neck.
I also made his ears a bit smaller & stick up instead of making them floppy as the pattern shows to do.

I really encourage you to make changes when you feel inspired to in every project you make.

I have learned tons of new things over the years from doing this and always been pleasantly surprised by the results!


Ta Da!

What do you have planned for today?

Please leave us a note and let us know!

We would love to hear all about it!

xoxoxo
Melissa & Archie