Showing posts sorted by relevance for query tunisian crochet. Sort by date Show all posts

Monday, December 10, 2012

Tunisian Crochet Project ~ Scarf

 
Happy Monday Everyone!
 
Archie and I are so excited because we have learned a new Craft that we just LOVE!
 
It is a form of crochet called Tunisian Crochet that is a marrying of knitting and crochet all in one!
 
It is so FUN!
 
We learned in our new Tunisian Crochet online class on Craftsy.com that once you  purchase the class, it is yours forever! 
 
The class includes amazing instruction through Video, PDF Lessons, Patterns and help from the instructor!
 
You take it on your own time and can never be behind in the lessons. :)
 
I love Craftsy.com and will show you another project next Monday from the Crochet Embellishments class I just took too! :) 


In addition to the class, I also bought this book on Amazon.com to learn each kind of stitch and use for a printed & bound guide.

It is a great book & is filled with patterns, photos and directions on how to make each stitch.


There are several stitches that you can master and choose to use for your projects.

So far I have learned the Tunisian Simple Stitch (TSS).

Here are two great blog tutorials that I also found that I think are helpful ...

http://crochetingthedayaway.blogspot.com/2011/10/tunisian-crochet-how-to-basic-tunisian.html

http://thingsbright.com/welcome-to-tunisian-crochet-week/

For my first project in Tunisian Crochet, I made Fred a warm and wonderful scarf.

He just loves it!
 
It was so FUN to learn a new form of crochet that uses a longer hook that you crochet the stitches onto and off of like knitting and also has a structure when you form the stitches that is similar in appearance to knitting. :)

 
Here is a close up of the scarf where I used the Tunisian Simple Stitch for the long brown body part of the scarf and then added a row of crochet bobbles and several rows of single crochet at each end for a neat effect.


This is an example of a Tunisian Hook that is also called an afghan hook.

 
I purchased all the Tunisian hook sizes ~ F through K ~ (also called the Afghan Hook) that I will need for most of my projects on Joann's .com
 
My favorite brand of crochet hooks is Boye so that is what I chose but lots of companies make them in more than just aluminum.  You can get bamboo in these and even larger sizes and they have kits you can get for working Tunisian crochet in the round too.
 
The instructor of the Craftsy.com class, Jennifer Hanson, has a wonderful website called stitchdiva.com that has her original tutorials, classes, yarn, patterns and lots of hooks & supplies that you can purchase too.


To further celebrate my new craft and hooks, I purchased this neat vintage ceramic vase on Etsy.com that is the perfect container to hold and display all of my new hooks. :)

I love shopping on Etsy.com!

You can also find lots of hooks and patterns for Tunisian and traditional crochet & knitting on etsy.com!

Please let me know if you learn or already practice this fabulously fun art form.

I would love to hear all about your projects and favorite places to shop for lots of neat things to use to further learn and enjoy this craft!

I would also love to hear what other new things you have been learning in classes, the kitchen, books, online or in daily life that you enjoy and want to share!

Thanks for taking the time to see what I have been working on in the evenings while relaxing with Fred & R-Chee.

Have a Super day everyone!

xoxox
Melissa & R-Chee

Tuesday, September 08, 2015

Tunisian Crochet ~ New Owl Doll


Happy Tuesday everyone!

R-Chee & I hope you all had a wonderful Labor Day Weekend!

Labor Day traditionally marks the end of the hot Summer to welcome in the fresh cooler breezes of Fall.

I thought it would be FUN to celebrate this special time of year by crocheting a new owl doll this weekend.

I made him without a pattern and combined the techniques of tunisian crochet, freeform crochet and traditional crochet stitches to make this fun fellow.


The first step was to create the body shape by making what looked like a long rectangle or short scarf with the tunisian crochet stitch to form the body and head.

When my long rectangle was done, I folded it in half and sewed up the sides with matching yarn and my yarn needle.

Then I stuffed him and partially closed up the bottom to form the beginnings of leg openings.


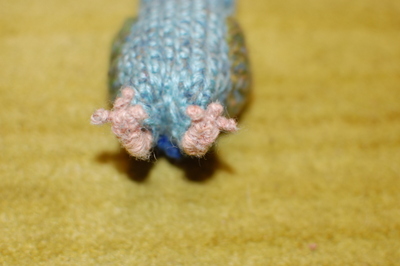
The final steps were done by pulling out my traditional crochet hook and using freeform crochet techniques to make the eyes, wings, sash, beak, under eye feathers and feet.


Ta Da!

He is all done!

I think he looks cute in my collection of other tunisian crochet and freeform crochet dolls I have made over the years.

What a FUN project!

What fun things are you doing?

Please leave us a note and let us know!

We would love to hear all about them!

xoxox
Melissa & R-Chee


Wednesday, January 30, 2013

Tunisian Crochet Pug Doll Up Close & Personal


Happy Wednesday everyone!

Thank you so much for all of your wonderful birthday wishes for Archie yesterday!

He had a wonderful day all because of you! :)

He got a bunch of new yummy toys that he cannot wait to show you on Friday!

Today I want to show you a closer view of the new Tunisian Crochet pug doll I made for him.

This is the second project I have created with this new craft I am totally enjoying! Here is the first project I made with all the links to how you can get started too if you would like!

I just love the look of the stitches of the first stitch I have learned so far... the Tunisian Simple Stitch.


The Tunisian Crochet technique is perfect for creating flat work so I made up a pug doll for Archie using Tunisian Crochet for the body and single crochet stitches for all of the limbs, ears, birthday hat and facial features.

I free formed the shapes for all of features and sewed them on after the pug body was complete, sewn and stuffed.

It was so FUN to make it up as I went and watch him come to life!


The glass eyes came all the way from Germany!

Melanie found them on Probear.com!

She just made these two amazing fully jointed mohair bears!


I think they put the perfect final touch to his puggy face and the wonderful bears!

They come in all sorts of sizes and are very affordable!


Ta Da!

I just love how he turned out and he was so FUN to make for my Archie!

Happy Birthday little boy!

We are so lucky to have you!

xoxoxo
Melissa

Monday, June 09, 2014

Warm Head & Heart ~ New Tunisian Crochet Hat & Cowl


Happy Monday Everyone!

I have a FUN project to show you that I just finished!

On Friday, Jimmie hinted to you that I was up to something with my Tunisian crochet hook and little balls of yarn from my stash.

And as promised... I am excited to show it to you today! :)

To tell you the truth, when I started this project, I was not sure what I was going to make.

I just felt like switching my stitches to Tunisian from my regular crochet for a bit while also working down the extra yarn I have in my stash so that I can buy more! :)

So I decided it would be FUN to make lots of little squares and figure out what it was going to be later.

From the first photo above, you can see I just made a whole pile of them until I was inspired to start sewing them together into something.

I love this time of year because I have some free time to create new things to enjoy, learn from and SHARE with you. :)

After sewing a few of them into rows of 3, I decided it would be neat to make it into another cowl scarf since I love the one I made last June and thought this tight Tunisian crochet fabric I created would be not only colorful but very warm on our cold Colorado Winter days that will arrive before we know it!


So I joined them together with regular sc back loop only crochet rows in between to give the cowl some stretchy give.


Ta Da!


I just love how it turned out!

You cannot see, but I am smiling under my new comfy cowl! :)


When I finished my cowl I still had some extra squares so I decided to make a hat!

Here is one side...


and this is the other!


Here is my new Hat and Cowl set for 2014!


When I was all done I still had extra squares so I made 2 more hats!
One for myself and one for my sister, Melly, which I forgot to snap a picture of.

I was so excited to give it to her that I wrapped it up and surprised her with it before I took any, but I will in the Fall when we wear them together and show you!

What FUN things are you up to today?

Please leave me a note and let me know!

I cannot wait to hear all about it!

xoxox
Melissa

Sunday, January 03, 2016

Tunisian Crochet Wall Hanging ~ Fun with Fiber ~ New Year 2016 ~ New Artwork


Happy New Year everyone!

I just finished a new piece that I cannot wait to share with you!

It is my new wall hanging I made for my home.

This was a really FUN project that I enjoyed from start to finish.

I had no idea what I was creating when I started.

I just knew that I wanted to make a colorful, large piece for highly visible wall in my home.

I wanted it to have a rich feel and a thick fabric with a heavy fringe at the bottom.

Tunisian Crochet is a fun and easy technique that I learned in 2012.  It creates a thick wonderful fabric that looks like it has been knitted.

My favorite stitch is the Tunisian Simple Stitch (TSS).

Here are 2 blog posts that I found that have good tutorials on how to begin...


It is a very versatile stitch that I have also used to make several dolls, hats and neck gators over the years.


To make the fabric, I held two strands of yarn together.
I chose a worsted weight acrylic variegated yarn for the 1st strand that would be consistent through the whole piece.

The second strand of yarn changed throughout the whole piece as I used different wool and blended fiber yarns from my stash.  

I had no idea what it would look like when I started. 

I decided to make it in a series of panels so I could control how long and wide it would be without worrying about the weight & exact size of the piece as I worked on it.

It gave me a lot of flexibility with the end result & kept it very portable so I could work on it wherever I was!


Each panel is unique and has its own subtle color changes.

If I made this in one huge piece, the color changes would not have been as interesting because the flow would have been uniform from left to right instead of top to bottom.

When I finished all of the panels I lay them all out and turned them this way and that to find the color flow I liked across the piece.

It was an exciting process to see it come together from 5 individual pieces into one cohesive large tapestry.


Once they were placed in the order I liked, I turned them over wrong side up and sewed them together with my yarn needle & more long scraps of yarn from my stash.

Happily, another neat effect that happened by making them in panels is that the seams of each joined panel created a divided texture and drape that added a lot of character to the whole piece and prevented it from looking like a blanket hanging on the wall.

The next step was to crochet a border of burgundy around the whole piece.  I used a bulky weight yarn and I single crocheted 2 or 3 rows to get the size border I liked.


Then I cut lots of bulky and worsted weight fibers from my stash in the same color pallet to create the fringe.

An easy way to get them to be all the same size is to choose a book or piece of cardboard that is the length of the fringe you want to create.

Wind the fiber around the book over and over and cut across the fibers at the top of the backing you choose.

You will have a pile of fibers that are double the length of your fringe.

Grab as many fibers you want in each tassel and fold them half.

Place your crochet hook where want to place the tassel, put the group of yarn on the hook, bring the ends through the loop and adjust the tension you like for your knot. 

Repeat this process all the way across.  Because of the thickness of the fringe I wanted to create, I made each yarn bundle bulky and placed them in every other chain at the bottom of the border.  

When it was all done I added individual colors of worsted weight fibers randomly along the fringe line too to have color pops along the way.

For a visual explanation, check out this tutorial of a pom pom wall hanging that also has photos at the end of the post to show you what I described above.


Ta Da!

R-Chee was by my side through the whole project.
Can you see his little pug feet sticking out under the table? :)


The Wall Hanging is about 48 x 60 and weighs about 10 lbs.

The weight and size of the wall hanging could have made the installation challenging.

I did not want it to sag or stretch when I mounted it so my solution was to create an illusion of it hanging from delicate rings while actually providing structure along the top.

The wall hanging is hung on its own like a picture. 

I crocheted a sleeve across the top back portion and slid a long piece of wood in it to hang it from. Then I used two sawtooth hangers in the wood to hang the wall hanging on the wall.

The rings at the top are wood drapery rings that are floating above the actual piece. They are just turned flat instead of used as rings on a rod to hang a curtain. I actually took the hanging clips off the rings and just hung each one right up to the top edge of the piece.

Voila!

I just LOVE how it turned out!

What a FUN way to start 2016!

I cannot wait to see what else comes to life for all of us in the coming year.

Thank you so much for always playing with me and Archie!

You all make this journey a wonderful and exciting place to explore together!

xoxoxo
Melissa & Archie

Tuesday, February 19, 2013

Tunisian Crochet - Ollie the Parrotlet Doll


Happy Monday everyone!

I am so excited to show you the new Tunisian Crochet project I just did!

I made him up for a special Valentine's Day gift for Melanie!

It was so FUN to create from the top of his head down to his cute little bendable toes!


I wrapped wool yarn around floral wire to create his feet so that they would bend and hold the weight of the doll while standing.


... and I added needle felting accents to his forehead, eyebrows and cheeks to create his texture and expressions.


His body was done with the Tunisian crochet - simple stitch 
I love the woven like fabric it creates!


... and his wings were created in single crochet with my regular crochet hook. :)


I gave him to Melly on Valentine's Day and she just loved him!

I think the hardest thing about making my gifts is keeping them a secret! :)

I kept wanting to send Melly photos of him while I was making him!

I was pretty proud of myself for keeping him a surprise!

Tee Hee!

Did you make any gifts, either food or crafty items for gifts this year?

Please leave me a note and tell me all about them!

I am excited to hear what you created!

xoxoxo
Melissa & R-Chee

Wednesday, September 18, 2013

My New Tunisian Crochet Doll ~ Little Lamb


Happy Wednesday everyone!

I am so excited to introduce you to my new Tunisian Crochet Lamb Doll that I just made!

Just like the Pug, Lion, Parrotlet, and Bunny Dolls, I made him up as I went. :)

I love making free form dolls without knowing what they are going to look like in the end!

It is exciting to see who shows up!


Here he is!

I cracked up when I put in the final stitch and took a step back to look at him.

It looks like he has alot to say ~ doesn't it?!


Although I do not have a pattern, I can share that I used a G size Boye tunisian and a size G crochet hook for the arms, legs, tail & fleecy bobbles.

The whole doll is made with my favorite yarns from Lion Brand.

His face is the Fisherman's Wool

His bobble fleece is Wool Ease Thick & Quick

and his body is Amazing Yarn!

I took lots of photos for you to see him pop to life!


Ta Da!

Here is the whole family of tunisian crochet dolls that I made this year with the pug doll living in a different room and the parrotlet doll at Melanie's house! :)


R-Chee was an excellent helper through the whole project!

I think he was listening to bedtime stories from the lamby even before he was complete!

How FUN!

What FUN things are you up to today?

Please leave us a note and let us know!

We cannot wait to hear all about them!

xoxoxo
Melissa & R-Chee